
How to Take Professional Headshots at Home
This article is part of our Professional Headshots collection.
Knowing how to take a great headshot at home really just comes down to a few key things: nailing the soft natural light, picking a simple background, and capturing a genuinely confident expression. Get those right, and you can absolutely create a high-quality image that rivals what you'd get from a studio, all while saving a good chunk of time and money.
Why a Great Headshot Matters (and How to Get One at Home)
Think of your professional headshot as your digital handshake. In a world where people often see your online profile before they ever meet you, it’s a critical first impression. It’s way more than just a picture—it’s a powerful branding tool that communicates your professionalism and personality before you even say a word.
On a platform like LinkedIn, a polished headshot can make a massive difference. Profiles with professional photos are viewed 14 times more than those without. That's not a small number.
The good news? You don't need to hire an expensive photographer anymore to get a killer shot. Thanks to incredible smartphone cameras and easy-to-use editing tools, the gap between a DIY photo and a studio portrait has shrunk — with AI headshots now available from $35, compared to $200–$500 for a traditional session.
Defining Your Professional Brand
Before you even think about picking up a camera, take a minute to consider the image you want to project. Are you a sharp corporate executive, a friendly tech consultant, or a bold creative artist? Your headshot needs to line up with your industry and personal brand.
A lawyer, for instance, might go for a traditional, confident look against a neutral backdrop. A graphic designer, on the other hand, could choose something more creative and expressive that shows off their personality.
Your headshot is a key part of your personal brand. It should authentically reflect your professional identity and the audience you want to attract. A well-crafted image builds trust and makes you more approachable.
This guide will walk you through the entire workflow for producing stunning results right from your home. We'll cover everything from gear selection to the final edit, demystifying the technical stuff so you can focus on capturing a headshot that truly works for you. Whether you need a standout photo for a job search or just want to refresh your online presence, learning how to improve your LinkedIn headshots is an invaluable skill.
Here's a quick look at what we'll cover:
- Mastering Light: How to find and use natural window light for that soft, flattering effect.
- Gear and Backgrounds: Choosing the right camera (your phone is probably fine!) and a simple, distraction-free background.
- Posing and Expression: Practical tips to help you look confident, relaxed, and approachable on camera.
- Basic Editing: Simple techniques to polish your final image and give it a professional finish.
DIY vs Professional Studio Headshot Comparison
Deciding between a DIY session and hiring a pro can be tough. Both have their merits, and the best choice really depends on your budget, timeline, and what you need the photo for. Here's a quick breakdown to help you weigh the options.
| Feature | DIY At-Home Headshot | Professional Studio Session |
|---|---|---|
| Cost | Free or very low-cost (using existing gear). | Can range from $200 to $1000+, depending on the photographer and package. |
| Convenience | Highly convenient. Shoot anytime you want in the comfort of your own home. | Requires scheduling, travel, and coordinating with the photographer. |
| Control | Full creative control over styling, posing, and the final look. | The photographer directs the shoot, bringing their professional expertise and vision. |
| Equipment & Lighting | Relies on natural light and basic equipment like a phone or consumer camera. | Access to high-end cameras, professional lighting setups, and various backdrops. |
| Expertise & Guidance | You are the photographer, model, and director. Requires some self-awareness and skill. | Benefits from an expert's eye for posing, expression, and technical details. |
| Final Quality | Can be excellent with the right techniques, but may lack that final professional polish. | Consistently high-quality, professionally retouched images are the standard. |
| Best For | Quick updates, budget-conscious professionals, social media profiles, casual branding. | Corporate websites, executive bios, speaking engagements, high-stakes professional use. |
Ultimately, a professional photographer brings years of experience and top-tier gear that's hard to replicate. However, for many situations, a well-executed DIY headshot is more than enough to make a fantastic impression online.
Choosing the Right Gear for Your Home Studio
Let's get one thing straight: you don't need a Hollywood budget to get a fantastic headshot. In fact, you probably already own the most important piece of gear. Getting a professional look at home is far more about your technique than it is about dropping thousands on fancy equipment.
The first big decision is what to shoot with. For most people, this comes down to two options: the smartphone in your pocket or a dedicated DSLR or mirrorless camera.
Smartphone vs. a "Real" Camera
Modern smartphones are incredible. Flagship models from the last few years pack some serious camera tech, and software features like Portrait Mode do a surprisingly good job of faking that blurry background (known as bokeh) that used to be the exclusive domain of pro cameras. For many people, a phone is more than enough to get a sharp, clean headshot.
But if you own a DSLR or mirrorless camera, now is the time to dust it off. Nothing beats the image quality from a larger sensor and a real lens. The manual control you get over settings like aperture and ISO gives you the ultimate creative freedom to dial in the exact look you want, from the sharpness of your eyes to the creaminess of the background blur.
Here’s a quick rundown of how they stack up:
| Feature | Smartphone Camera | DSLR/Mirrorless Camera |
|---|---|---|
| Ease of Use | Dead simple. Point, shoot, and let the software work its magic. | Takes practice. You'll need to learn the basics of manual settings to unlock its real power. |
| Image Quality | Surprisingly good. Capable of producing sharp, professional-looking images in the right light. | Unbeatable. The larger sensor captures way more detail, light, and color information. |
| Background Blur | Done with software (Portrait Mode). It's good, but can look a little artificial or miss spots. | Created optically with a good lens. This gives you a natural, buttery-smooth blur. |
| Cost | Basically free. You already have it. | An investment. Can get pricey, but it's a versatile tool for all kinds of photography. |
At the end of the day, the best camera is the one you have with you. A killer shot from an iPhone will always beat a mediocre, poorly-lit photo from a $5,000 camera.
Why Your Lens Is More Important Than Your Camera
If you're going the DSLR or mirrorless route, the lens you choose makes a massive difference. Using a wide-angle lens—like the one on the front of your phone for selfies—is a classic mistake. It distorts facial features, making your nose look bigger and your face wider. It's just not a flattering look.
For headshots, photographers gravitate toward focal lengths that compress the scene, making facial features look more natural and proportionate.
- 50mm Lens: This is the workhorse of the photography world. Often called the "nifty fifty," it’s an affordable and fantastic starting point that gives you a natural field of view without any weird distortion.
- 85mm Lens: The quintessential portrait lens. An 85mm lets you stand a bit further back from your subject, which often feels more comfortable for them, and it produces absolutely gorgeous background compression and creamy bokeh.
Pro Tip: Stuck with the 18-55mm "kit lens" that came with your camera? No problem. Just zoom it all the way in to 55mm. This will mimic the flattering compression of a dedicated portrait lens and instantly improve your shots.
The Three Must-Have (and Dirt-Cheap) Accessories
Okay, you've got your camera. Now you just need a few cheap items to take your setup from "selfie" to "studio." You can buy them, but you can probably find substitutes lying around the house.
- A Tripod: Stability is everything. A tripod kills camera shake, ensuring your photo is tack-sharp. More importantly, it frees up your hands so you can focus on your pose and expression, which is crucial if you're flying solo.
- Remote Shutter or Self-Timer: Poking your camera to take a picture is a surefire way to introduce blur. A tiny Bluetooth remote shutter lets you fire off shots without touching anything. Don't have one? Just use your camera's built-in self-timer. It’s a perfect, free workaround.
- A Reflector: This is the oldest trick in the book for a reason. A reflector bounces light back into the shadows on your face, brightening them up and adding that little sparkle in your eyes that screams "professional." You don't need to buy one—a big piece of white foam board from a craft store or even a sheet of white poster board works just as well.
Mastering Your Lighting and Background
Let’s be honest: lighting isn't just a part of photography; it’s everything. Great lighting is what separates a polished, professional portrait from a forgettable snapshot. It shapes your face, sets the mood, and tells the viewer’s eye exactly where to look. The best part? You don't need a truckload of expensive studio gear to nail it.
Your home is already full of incredible light sources, and the most powerful one is completely free: a large window. Natural light is the secret weapon for anyone figuring out how to take professional headshots at home. It’s soft, incredibly flattering, and creates beautiful, gentle shadows that give your image depth without ever looking harsh.
This overview breaks down the simple, essential gear you need to control your home studio setup, focusing on the camera, a way to keep it steady, and something to shape the light.
![]()
As you can see, the workflow is simple. A basic camera (even your phone), a tripod for crisp shots, and a simple reflector are all you really need to create a high-quality, professional-looking setup.
Harnessing Natural Window Light
First things first, find the biggest window in your house and kill all the other lights in the room. Mixing different types of light—like a warm yellow lamp and cool blue daylight—creates weird color casts that are a nightmare to fix in editing. You want a single, beautiful source of light to work with.
The perfect time to shoot is when the sun isn't blasting directly through the window. Direct sun is a recipe for harsh, ugly shadows and will have you squinting for dear life. Instead, you're looking for bright, indirect light. This usually happens mid-morning or late afternoon, depending on which direction your window faces.
Now, position yourself so you're facing the window at about a 45-degree angle. Don't stand flat-footed in front of it. By turning your body slightly, you’ll let the light illuminate one side of your face more than the other. This creates a gentle transition from light to shadow, which is way more dynamic than flat, head-on lighting.
The goal is to create soft shadows, not get rid of them. Shadows are what give your face dimension and shape. A classic portrait technique is called Rembrandt lighting, where a little triangle of light appears on the cheek that's further from the light source. It's a hallmark of professional photography and surprisingly easy to achieve with just one window.
If the shadows on one side of your face seem a bit too dark, that's where your DIY reflector comes into play. Grab a piece of white foam board or even just a large piece of poster board and hold it on the shadow side of your face, just out of the camera's view. Angle it toward your face until you see it gently bounce light back, softening those shadows to the perfect level.
Working with Artificial Light
What happens when natural light just isn't cooperating? An affordable ring light can be a fantastic substitute. There's a reason they're so popular: they produce a very even, direct light that minimizes shadows and is generally quite flattering.
To avoid that flat, "deer in the headlights" look, just follow these tips:
- Get the position right: Don't just stick the ring light directly in front of you. Raise it slightly above your eye level and angle it downward. This mimics the natural direction of the sun and creates more pleasing shadows under your chin and nose.
- Diffuse, diffuse, diffuse: Most ring lights come with a diffuser cover. Use it. Always. This softens the light, gets rid of harsh glare, and instantly makes your setup look more professional.
- Adjust the brightness: Start with the light on a lower setting and dial it up gradually. The idea is to light your face clearly without blowing out the highlights (making the bright parts of your skin look like pure white blobs).
Choosing a Background That Works
Your background is just as critical as your lighting. A messy, cluttered, or distracting background will immediately sabotage the professional feel of your headshot, no matter how good you and the lighting look. The focus needs to be 100% on you.
The easiest—and often the best—option is a solid, neutral-colored wall. Think white, gray, or beige. Just make sure it's clean and that there aren't any scuff marks, outlets, or light switches in the frame. Pro tip: stand a few feet away from the wall to create some separation. This adds a sense of depth and prevents you from casting a sharp shadow right behind your head.
Another great option is to thoughtfully use your home environment. A tastefully blurred home office can hint at your profession and inject some personality. If you go this route, the key is to make sure the background is tidy and uncluttered. A few books on a shelf, a simple piece of art, or a plant can work wonders, but they need to be far enough behind you to be softly out of focus.
Background Checklist:
- Is it distracting? The background should support you, not compete with you. Avoid busy patterns, loud colors, or a pile of laundry.
- Does it match my brand? A clean, modern office background is great for a tech professional, while a warm, textured wall might be better for an artist.
- Is there enough separation? Putting some distance between you and the background is the secret to getting that professional depth-of-field effect where you are tack sharp and the background is nicely blurred.
By carefully planning your lighting and your background, you’re building the foundation for a truly professional headshot. These two elements work together to control the mood, focus, and overall quality of your image, proving you have everything you need to get the job done right at home.
Nailing Camera Settings and Composition
With your lighting and background ready to go, it’s time to get into the technical details that make a headshot look truly professional. Don't get bogged down by terms like aperture and ISO. Think of them as simple controls for shaping how your final image looks and feels. You only need to master a few key settings to elevate a basic photo into a polished portrait.
If you’re shooting with a smartphone, your job is a lot easier. Modern phones, especially with Portrait Mode, handle most of the heavy lifting for you. The software is smart enough to blur the background automatically, mimicking a professional camera and putting the focus squarely on you. Just tap your face on the screen to lock in the focus and exposure, and you’re pretty much set.
But if you're using a DSLR or mirrorless camera, this is where the real magic happens. Switching over to Manual (M) or Aperture Priority (A or Av) mode gives you total creative control to fine-tune the final look.
The Exposure Triangle Made Simple
Think of aperture, shutter speed, and ISO as three legs of a stool. When you adjust one, you often need to tweak another to keep everything balanced for a perfectly lit photo. For a headshot, we only need to worry about getting a few things right.
1. Aperture: Your Secret to a Blurry Background
Aperture, measured in f-stops (like f/1.8, f/4, f/8), does two main things: it controls how much light gets in and dictates your depth of field. Depth of field is just a fancy way of saying how much of your picture is in focus.
For that classic headshot look, you want a shallow depth of field. This keeps you perfectly sharp while the background dissolves into a soft, pleasing blur. It’s a signature of professional portrait photography because it makes you pop right out of the frame.
- How to get the look: Set your lens to its widest aperture—that means using the lowest f-number it can go to (like f/1.8, f/2.8, or f/4). A lower number equals a wider opening, which lets in more light and creates more background blur.
A wide aperture like f/2.8 is your best friend for isolating yourself from the background. It gives your headshot that coveted professional feel and directs the viewer's eye exactly where you want it: on your expression.
2. Shutter Speed: Freezing the Moment
Shutter speed is all about how long your camera's sensor is exposed to light. A fast shutter speed freezes motion perfectly, while a slow one can introduce blur. Since you're the subject, even a tiny bit of movement can soften the image and make it look unprofessional.
To guarantee a crisp, tack-sharp photo, you need a shutter speed fast enough to cancel out any blur from your own subtle movements or a shaky hand. A good rule of thumb is to set your shutter speed to at least double your lens's focal length.
- What to use: If you're using a common portrait lens like a 50mm or 85mm, a shutter speed of 1/125s or faster is a safe bet. This will capture your expression with absolute clarity.
3. ISO: Keeping Your Image Clean
ISO is a measure of your camera's sensitivity to light. A low ISO, like 100 or 200, isn't very sensitive, which results in a super clean, high-quality image without any grain. As you crank the ISO up, the camera gets more sensitive, which is great for dark scenes but introduces digital noise—that ugly, grainy texture.
Because you’ve already set up some great lighting with a window or another source, there's no need to push your ISO high.
- The goal: Keep your ISO as low as you can, ideally somewhere between ISO 100 and 400. This ensures you get the cleanest possible image, which is exactly what you want before you start editing.
Composing Your Shot for Maximum Impact
Okay, your settings are dialed in. Now, let’s talk composition—the art of arranging yourself within the frame. This is less about rigid rules and more about making creative choices that draw people in.
Use the Rule of Thirds
Picture your screen with two horizontal and two vertical lines, like a tic-tac-toe board. The "rule of thirds" is a simple guideline that suggests placing important things—like your eyes—along these lines or where they cross. It almost always creates a more balanced and dynamic photo than just sticking yourself right in the middle.
Try framing the shot so one of your eyes lines up with one of the top intersection points. It’s a small tweak that makes a big difference.
Think About Framing and Cropping
How much of yourself should be in the photo? That really depends on the vibe you're going for.
- The Classic Head-and-Shoulders: This is your go-to for LinkedIn and most corporate profiles. Frame the shot from the chest up and leave a little bit of breathing room above your head.
- A Wider Environmental Shot: Pulling back to a waist-up shot can reveal more of your personality or even a hint of your workspace. This works great for a personal website or a creative portfolio.
Whatever you do, avoid cropping too tight on your face or cutting off your chin. It’s always better to give yourself some extra space in the frame—you can easily crop in closer during the editing stage. Taking a moment to get these settings and composition right is what learning how to take professional headshots at home is all about.
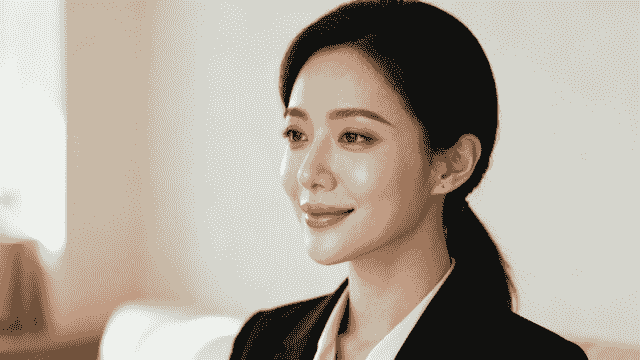
Posing and Expression Tips for a Confident Look
You can have the best camera and a flawless lighting setup, but if your expression is stiff or your pose feels awkward, the whole photo falls flat. This is the moment you stop just taking a picture and start creating a portrait that actually connects with people. The goal is simple: look confident, approachable, and authentic. Nail those three, and you'll build immediate trust.
Let's be honest, feeling comfortable in front of a camera—especially when you’re both the photographer and the subject—is a real challenge. The trick is to relax and just move. Don't freeze in one spot. Before you even start shooting, shake out your arms, roll your shoulders, and maybe even put on some music to loosen up.
Mastering Your Body Language
How you hold yourself can completely change the vibe of your headshot. If you stand square to the camera, it often comes across as confrontational or robotic, almost like a passport photo. We can do better than that. A few simple adjustments will create a much more dynamic and flattering look.
First, try turning your body about 45 degrees away from the camera. From there, just turn your head back to face the lens. That simple twist is universally flattering. It adds dimension, helps define your jawline, and makes you look far more relaxed and engaged.
Then there's the age-old question: "What do I do with my hands?" Letting them hang awkwardly at your sides never feels right. Here are a few go-to options:
- Crossed Arms: It's a classic for a reason. This pose signals confidence and authority. The key is to keep your shoulders relaxed so you don't look defensive.
- One Hand in a Pocket: This is my personal favorite for a casual yet professional feel. It's an easy way to look composed without coming across as stiff.
- Leaning Slightly: A subtle lean forward from your hips toward the camera creates a sense of engagement. It’s a small move that makes you seem more connected to the person looking at the photo.
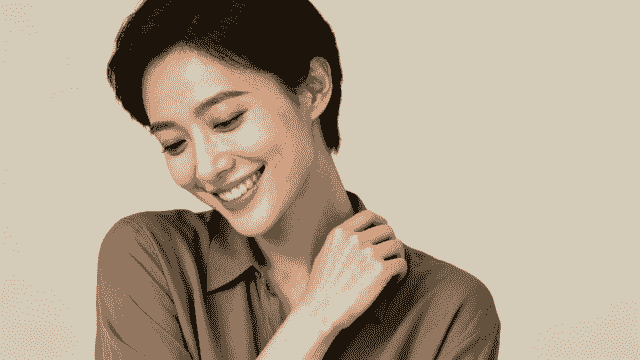
Achieving a Genuine Expression
The single most important part of a great headshot is a genuine expression. A forced smile is painfully obvious and can make you seem insincere. The secret to a real smile isn't in your mouth—it's in your eyes. Photographers call this the "Duchenne smile."
Instead of thinking "cheese," think about something that actually makes you happy or proud. It could be a recent win at work, a funny memory, or an inside joke. That thought will trigger a natural reaction, creating an authentic smile that lights up your eyes.
Here's a pro tip: try talking or laughing just before the shutter clicks. Saying a word that ends in an "uh" sound, like "yoga" or "mocha," naturally parts your lips and relaxes your jaw. It leads to a much more natural expression than a forced, toothy grin.
This is especially critical for anyone in a client-facing role. To see how different industries project confidence and trustworthiness, check out the examples in our guide to lawyer headshots.
Choosing Your Wardrobe
Your outfit is a crucial supporting character in your headshot. The right clothes can reinforce your professional brand, but the wrong choice can be a major distraction.
Stick to solid colors that complement your skin tone. Jewel tones—like deep blues, rich greens, and burgundies—are flattering on almost everyone. It’s best to steer clear of busy patterns, big logos, and loud colors like neon, since they pull focus away from your face.
More importantly, make sure your outfit aligns with your industry. A creative director might go for a stylish sweater, while a financial consultant is better off in a tailored blazer. You want to look like the best, most polished version of your professional self. This is exactly why knowing how to take professional headshots at home is becoming such a valuable skill.
In fact, a recent survey found that 44% of Americans would consider using modern methods like AI for their professional photos, and that number jumps to 55% among Millennials. You can dig into this trend and see how a professional photo impacts hiring decisions in the full survey.
Editing Your Headshot for a Polished Finish
The photo you snapped is just the starting point. Post-processing is where you take a great shot and make it truly exceptional. This isn't about making yourself look like someone else; it's about adding that final layer of polish that screams "professional."
You don't need a fancy desktop setup for this, either. Powerful mobile apps like Adobe Lightroom or Snapseed have intuitive tools that make it easy for anyone to get studio-quality results. The goal here is refinement, not a complete reinvention.
Subtle Adjustments Make All the Difference
First, tackle the basics. A tiny bump in exposure can bring your whole photo to life, while a quick white balance adjustment makes sure your skin tone looks natural—not too orange or blue. Getting these foundational elements right is half the battle.
Next, it's time to play janitor. Scan the image for any small distractions. That stray hair that won't cooperate? A piece of lint on your jacket? A temporary blemish? Use a spot healing tool to gently zap them away. The key is subtlety. You want to look like you on your best day, not like a cartoon.
Pro Tip: A trick we use in the studio all the time is to selectively sharpen the eyes. Grab a sharpening or detail tool with a small brush and add just a touch of clarity to the iris. It’s a tiny detail, but it draws the viewer in and makes your expression feel more direct and engaging — eyes are where first impressions form in as little as 100 milliseconds.
This DIY approach gives you incredible control, and the cost savings are huge. The median price for a professional headshot session in the U.S. hovers around $250 and can easily jump past $550 in major cities. Compare that to the affordability of a home setup paired with a powerful editing app. You can find more details on how these costs break down in this headshot cost analysis on Studioshot.ai.
By focusing on these simple, targeted edits, you can confidently turn your home-shot photo into a polished, professional image ready to make an killer first impression.
What Our Data Reveals About At-Home Headshot Results
A significant portion of BetterPic users take their source photos at home. Here is what drives the best results:
- Window light outperforms ring lights for AI headshot source photos. Users who submit photos taken near a window produce AI headshots that score 19% higher on our quality metrics than those using ring lights or overhead fixtures.
- Plain walls beat busy backgrounds in source photos. Even though our AI replaces the background, starting with a clean backdrop helps the AI isolate facial features more accurately, resulting in fewer artifacts.
- Phone cameras from 2022 or later produce sufficient quality. We see no meaningful difference in AI output quality between flagship phone cameras and mid-range models from the last 3 years. The limiting factor is almost always lighting, not camera hardware.
- The most common mistake in at-home photos is shooting from too far away. 34% of rejected uploads are flagged for being too far from the subject. Head-and-shoulders framing at arm's length produces the best results.
Not Up for a DIY Photoshoot? Try an AI Headshot Generator Instead
If the thought of wrangling lights, camera settings, and your own facial expressions sounds like a headache, there's another path you can take. A seriously modern one that skips the camera altogether. AI headshot generators have popped up as a fast, budget-friendly way for professionals to get high-quality images without any of the hands-on work.
The concept is simple. You find a platform you like, upload a handful of your existing photos—usually just casual selfies from your phone—and let the AI do the heavy lifting. In often less than an hour, it generates dozens of polished, studio-quality headshots for you in all sorts of styles and backgrounds.
What’s the Catch? Benefits vs. Drawbacks
The biggest draws here are speed and cost. For a fraction of what you'd pay a traditional photographer, you get a huge variety of images to pick from. It's a lifesaver if you need a quick update for your LinkedIn profile or company directory and just don't have the time for a full-blown shoot.
But, you do need to be aware of the trade-offs. While the tech has gotten incredibly good, the results can sometimes look a little too perfect or miss that spark of authenticity you get from a real photo. You also give up a lot of creative control; you're trusting the AI's interpretation instead of directing the shot yourself. If you're curious, you can learn how to create amazing AI headshots that look shockingly realistic.
This technology is exploding in popularity. The global AI headshot market is on track to hit $500 million, a jump of 150% from last year, which shows just how many people are embracing it. You can dig into the numbers in the latest AI headshot industry report from Headsnap.io.
For many professionals, AI generators strike a fantastic balance between convenience and quality. They solve a real problem when you're short on time or budget, delivering polished photos with almost zero effort.
Ready to skip the photoshoot and get dozens of professional, photorealistic headshots in minutes? BetterPic uses advanced AI to create studio-quality images that elevate your personal brand. Customize your look from over 150 styles and get results you love, backed by a 100% money-back guarantee. Get your AI headshots at https://www.betterpic.io.
Sources & References
- LinkedIn Profile Photo Tips — LinkedIn
- How Your Profile Photo Impacts Your LinkedIn Presence — LinkedIn Official Blog
- AI Image Generation Market Report — Grand View Research
- How AI Is Changing Photography — Forbes
- Professional Headshot Photography Pricing — Thumbtack

Written by
Apoorv SharmaHead of Performance
Apoorv leads performance and growth at BetterPic with 9+ years of experience across SEO, SEM, and growth marketing. He oversees content strategy, data-driven marketing, and hands-on testing of AI headshot platforms. Previously held senior performance marketing roles across the US, Belgium, and India.
- Google Analytics & Google Ads certified
- HubSpot Inbound & Content Marketing certified
- 9+ years in SaaS growth and performance marketing
Related professional headshots for individuals resources
Keep exploring this topic with focused resources from the B2C journey.
Primary destination:BetterPic homepage
Frequently Asked Questions
How do you take a professional headshot at home?
- Nail three key elements: soft natural light from a large window, a simple neutral background like a plain wall, and a confident genuine expression. Use your smartphone's Portrait Mode or a DSLR with a 50mm-85mm lens, and take many shots to find the best one.
Do you need a professional camera for headshots at home?
- No. Modern smartphone cameras with Portrait Mode can produce professional-quality headshots. Flagship phones use computational photography that rivals DSLRs in good lighting. Always use the rear-facing camera rather than the selfie camera for better image quality.
How much does a DIY headshot at home save vs a photographer?
- A DIY headshot costs essentially nothing if you own a smartphone. The median price for a professional headshot session in the US is around $250 and can jump past $550 in major cities. A well-executed home headshot can rival studio quality with the right technique.
What is the best pose for a professional headshot?
- Turn your body about 45 degrees from the camera and turn your head back to face the lens. Push your chin slightly forward and down to define your jawline. Keep shoulders relaxed, stand tall, and think of something genuinely positive for an authentic expression.
How do you get consistent team headshots when everyone works from home?
- Send a simple style guide specifying a solid neutral wall background, window-facing natural light, chest-up framing, and solid-colored business casual tops. For perfect consistency, have everyone submit their best shots and use an AI headshot service to apply uniform styling.
Save 87%on average on your professional photos.
Whenever, wherever you are.
Get studio-quality, 4K images in a variety of outfits & settings in less than an hour.
Get your headshots nowStart now