
How to Take Professional Photos for Your Brand
This article is part of our Professional Headshots collection.
Taking a professional photo isn't about having the most expensive camera—it's about capturing your competence and personality. The whole process really boils down to four key things: having a clear vision for your brand, using the right gear (which is way simpler than you think), finding flattering light, and being intentional with your composition.
This guide will break down exactly how to get it right and take professional photos that actually make an impact.
Why does a professional photo matter for your brand?
In our visual-first world, your headshot is often your first impression. It's your first impression on LinkedIn, the face of your personal brand on your website, and a mark of credibility in your portfolio. A high-quality photo communicates professionalism and attention to detail before you ever say a word.
Think of it as a small investment that pays huge dividends in how you're perceived.
The demand for high-quality, personalized images is exploding. The global photography market was valued at a staggering $105.2 billion in 2023, with portrait photography alone making up $20.6 billion of that. This shows just how much value people and businesses place on powerful, professional portraits.
Defining Your Photo's Purpose
Before you even touch a camera, ask yourself one simple question: what is this photo for? Your answer will drive every single decision you make, from what you wear to where you shoot.
- For a Corporate Bio: You'll want a clean, traditional look that screams trustworthiness and expertise. Think solid backgrounds and classic business attire.
- For a Creative Portfolio: This is your chance to let your personality shine. A more dynamic, environmental portrait that gives a hint of your craft will work wonders.
- For Social Media (like LinkedIn): The goal here is a balance of professional and approachable. A warm, confident expression is a must.
Understanding the context is everything. It ensures the final shot actually helps you achieve your goals. The different types of professional headshots each serve a unique purpose, so nailing this down first is the most critical step you'll take.
Your professional photo is not just a picture; it's a strategic communication tool. It should tell the story you want your audience—be it recruiters, clients, or colleagues—to hear.
To get started, here's a quick checklist to keep you on track.
Your Professional Photo Quick-Start Checklist
This table sums up the core elements you need to nail for a professional-looking photo, from the prep work all the way to the final shot.
| Element | Key Objective | Quick Tip |
|---|---|---|
| Purpose | Define where and how the photo will be used. | A corporate headshot for LinkedIn has different needs than a creative portrait for a website. |
| Wardrobe | Choose clothing that aligns with your brand. | Solid colors are almost always a safe bet. Avoid busy patterns that distract from your face. |
| Lighting | Ensure your face is evenly and softly lit. | Natural light from a window is your best friend. Face the light source directly. |
| Background | Select a clean, non-distracting background. | A simple wall or a slightly blurred outdoor scene works much better than a cluttered office. |
| Posing | Position your body to look confident and open. | Angle your body slightly to the camera instead of facing it straight-on for a more dynamic look. |
Focusing on these key areas will get you 90% of the way to a fantastic result, no matter what camera you're using.
Ultimately, knowing how to take professional photos is a skill that puts you in control of your personal narrative. Whether you're aiming for a classic corporate look or something with more creative flair, the core principles don't change. It all starts with a clear goal and an understanding of the message you want to send.
What gear and planning do you need before the shoot?
A truly professional photo begins long before you ever press the shutter button. I've found that thoughtful preparation is the secret ingredient that separates a polished portrait from a simple snapshot. This planning phase is really where you define the story you want to tell and gather the right tools to tell it effectively.
Your first move is to get crystal clear on the photo's purpose. Are you aiming for a conservative LinkedIn profile for a financial advisor, or a vibrant, creative headshot for a graphic designer? The answer drives every other decision—location, wardrobe, mood, and even your expression. A single photo can’t be everything to everyone, so clarity here matters a lot.
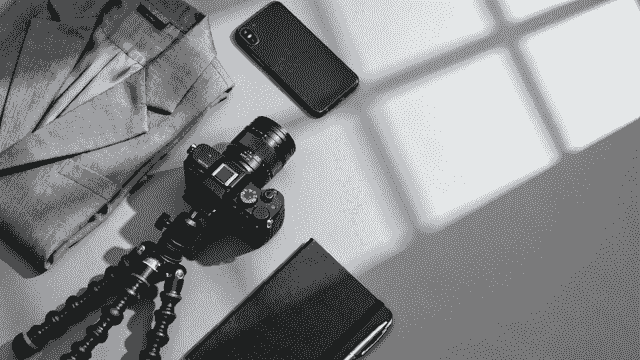
Choosing Your Core Photography Gear
While the person behind the camera matters more than the gear itself, the right tools definitely make a professional look much easier to achieve. You don't need to drain your bank account, but a few key pieces make a huge difference if you're serious about quality.
Here's a simple breakdown of the essentials:
- A Capable Camera: This could be a DSLR, a mirrorless camera, or even a newer high-end smartphone. The most important feature is having manual controls to adjust settings like aperture and ISO.
- A Portrait Lens: If you're using an interchangeable lens camera, a prime lens like a 50mm or 85mm makes a massive difference. These lenses are masters at creating that beautiful, soft, out-of-focus background (what photographers call bokeh) that makes your subject pop.
- A Sturdy Tripod: This is one of the most overlooked but vital pieces of gear. A tripod kills camera shake, guaranteeing your photos are tack-sharp. It's also your best friend if you're taking your own picture with a timer.
These items are the foundation of your toolkit. Having them ready lets you focus on being creative during the shoot, not fighting with your equipment.
A professional-grade camera is a powerful tool, but a tripod is what guarantees professional-grade sharpness. Don't skip it—it’s the simplest way to instantly improve the technical quality of your photos.
Dialing in the Right Camera Settings
With your gear in hand, it's time to get your camera settings right. Nailing this from the start saves a massive headache during editing. Think of these settings as the recipe for a clean, compelling portrait.
Start with these baseline settings and adjust as you go:
- Shooting Mode: Set your camera to Aperture Priority (A or Av) or full Manual (M) mode. This gives you direct control over the most important creative setting for portraits: the depth of field.
- Aperture (f-stop): To get that coveted blurred background, you need a wide aperture. An f-stop somewhere between f/1.8 and f/4 is the sweet spot for headshots.
- ISO: Keep your ISO as low as possible (ISO 100 is ideal) to avoid ugly digital noise or grain in your images. Only push it up to 400 if you're in a lower light situation and have no other choice.
- Shutter Speed: If you're in Manual mode, make sure your shutter speed is fast enough to prevent motion blur. A good rule of thumb, even with a tripod, is to stay at 1/125th of a second or faster.
Getting comfortable with these settings is a fundamental step in learning how to take professional photos. It's the technical language of photography, giving you precise control over the final image.
Wardrobe and Grooming Considerations
What you wear sends a direct message in your photo. Your clothing shouldn't be the star of the show; you are. The goal is to choose an outfit that supports your professional brand without being a distraction.
For your wardrobe, think simplicity and fit. Solid colors almost always beat busy patterns because they keep the focus on your face. Jewel tones like navy, maroon, and forest green tend to be flattering on most skin tones. Most importantly, make sure your clothes are clean, wrinkle-free, and fit you well. An ill-fitting shirt or jacket can instantly make an otherwise great photo look unprofessional.
Grooming is just as important. Your hair should be neat, and it pays to look after small details like your nails and any facial hair. The camera sees everything, and this attention to detail reinforces your professionalism. This foresight is especially vital when organizing photos for a whole company; you can learn more about coordinating headshots for teams to ensure everyone looks consistent and polished.
The continued demand for this level of quality is reflected in the photography industry’s strong growth. In the U.S., revenue has grown steadily and is projected to reach an estimated $15.8 billion in 2025, proving the lasting value of a high-quality portrait.
How do you get flattering light for professional photos?
Here's the truth about photography: light is everything. It's the one element that separates a flat, boring snapshot from a powerful, professional portrait. Forget about fancy gear for a moment—mastering light is about learning how to see it and then shape it to your advantage.
You can memorize every camera setting, but if your light is harsh and unflattering, the photo will never work. The good news? Beautiful light is everywhere, and most of the time, it's completely free. Your job is to find it and use it with purpose.
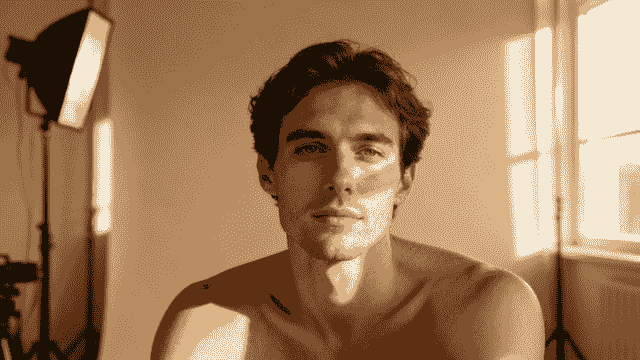
Harnessing Natural Light for Flattering Portraits
When you're starting, natural light is your best friend. It’s soft, plentiful, and creates a look that feels genuine and approachable. The trick is knowing where to find the right kind of natural light.
The classic beginner mistake is shooting in direct, harsh sunlight. This creates deep, ugly shadows and makes people squint. Nobody looks good like that. Instead, your goal should always be to find soft, diffused light.
Here are the best places to find it:
- Window Light: A large window is basically a giant, free softbox. Just position your subject facing the window to bathe their face in gorgeous, even light. It's the simplest and most reliable setup for indoor portraits.
- Open Shade: On a sunny day, look for the shadow cast by a large building. This spot is still lit by the bright sky (a massive light source!) but avoids the direct sun, giving you beautiful wraparound light without the squinting.
- Overcast Days: A cloudy sky is a photographer's dream. The clouds act as a massive diffuser, scattering sunlight and creating incredibly soft, even lighting everywhere. You can shoot just about anywhere without worrying about bad shadows.
- Golden Hour: That magical time just after sunrise or before sunset is famous for a reason. The sun is low, casting a warm, golden glow that is incredibly flattering on skin tones. It adds instant mood and polish.
The quality of light matters far more than the quantity. It’s better to have soft, directional light from one good source than bright, harsh light coming from every direction. Always turn off those nasty overhead indoor lights—they cast strange, unnatural shadows from above.
Simple Artificial Lighting Setups
When you can’t rely on mother nature, you can create your own beautiful light with a few basic tools. No need for a Hollywood-sized budget; a single light is often all you need for professional-looking results. Plus, it gives you total control, no matter the time of day or weather.
A softbox is one of the most versatile and beginner-friendly tools you can buy. It's a light source housed in a fabric box with a diffusion panel on the front, which softens and spreads the light beautifully. One softbox can create a classic, timeless portrait.
Another fantastic and affordable option is a ring light. These create a signature shadowless look and a distinct catchlight (the reflection of the light) in the eyes. They are dead simple to set up and are perfect for head-on shots where you need quick, flattering light.
Natural Light vs Studio Light for Portraits
Deciding between natural and artificial light comes down to the look you want, your budget, and how much control you need. Both have their place, and understanding their strengths and weaknesses is key to choosing the right one for your shoot.
| Lighting Type | Best For | Pros | Cons |
|---|---|---|---|
| Natural Light | Authentic, lifestyle, and on-location portraits. Great for beginners. | Soft, flattering, and free. Creates a relatable, approachable look. | Dependant on weather and time of day. Can be unpredictable. |
| Studio Light | Corporate headshots, product photos, and creative portraits requiring full control. | Consistent and controllable. Can be used anytime, anywhere. Allows for creative effects. | Requires investment in gear. Has a steeper learning curve to look natural. |
Ultimately, there's no "better" option—just the right tool for the job. Many professionals use a hybrid approach, combining a studio light with ambient natural light to get the best of both worlds.
Understanding Classic Lighting Patterns
Once you have your light source, the next step is positioning it to create depth and dimension. Where you place your light in relation to your subject creates different "lighting patterns" that sculpt their features.
Here are two of the most fundamental patterns to get you started:
- Key Light: This is your main light source. For a classic, flattering look, place it about 45 degrees to the side of your subject and slightly above their eye level. This simple placement creates a gentle transition from light to shadow across their face, adding a sense of depth.
- Fill Light: This is a secondary light (or a simple white reflector) placed on the opposite side of the key light. Its only job is to "fill in" and soften the shadows created by your main light. For a clean corporate headshot, you typically want softer shadows, so a fill light is extremely useful.
To take your shot to the next level, you can add a backlight. Sometimes called a "hair light," this is placed behind the subject, often pointing at the back of their head and shoulders. It creates a subtle, glowing outline that separates them from the background, adding a touch of polish that screams "professional."
Learning how to take professional photos is really just learning how to see and control light. Whether it's coming from a window or a softbox, the principles are the same. Start with one strong, soft light source, position it to create flattering shadows, and you'll see your portraits instantly transform.
How do you pose and capture authentic expressions?

Let’s be honest, most of us freeze up the second a camera points our way. That sudden stiffness is the number one killer of a great portrait. The real secret to a photo that feels both professional and genuinely you is learning how to manage your body language and coax out real expressions.
This isn't about twisting yourself into some awkward, unnatural shape. It’s all about making small, deliberate tweaks that project confidence and make you seem more approachable. Even a tiny shift can be the difference between a photo that looks stiff and one that feels alive.
Mastering Confident Body Language
The bedrock of any strong photo is your posture. Facing the camera straight-on is almost always a mistake—it tends to look flat and confrontational, a lot like a passport photo. We can do better than that.
The trick is to create some angles. Start by turning your body about 45 degrees away from the camera, then just turn your head back to look at the lens. This simple move instantly creates a more dynamic and flattering line, making you appear more three-dimensional.
Another easy but powerful adjustment is to shift your weight onto your back foot. This subtle change naturally relaxes your stance, pushes one hip out slightly, and creates a soft S-curve in your body. It’s a classic photographer’s trick to help people look more comfortable and at ease.
What to Do with Your Hands
Ah, the eternal question: “What do I do with my hands?” Letting them just dangle at your sides can look awkward, but clenching them into fists just screams tension. The solution is to give them something to do.
Here are a few foolproof options:
- The Relaxed Cross-Arms: Done wrong, this can look defensive. The key is to keep it loose—don’t grip your arms tightly. Let your hands rest lightly on your biceps. It's a classic for a reason and reads as confident and self-assured.
- One Hand in a Pocket: Casually hooking a thumb or sliding a whole hand into a pocket is an effortless way to look relaxed. Let the other arm hang naturally.
- The Gentle Lean: Find a wall or a desk and lean against it lightly. This gives your hands a natural place to rest and encourages your whole body to settle into a more comfortable posture.
Your pose should feel like a natural extension of who you are. The goal isn't to become a statue, but to find a comfortable starting position that radiates confidence. Once you have that, you can focus on the most important part: your expression.
Capturing Genuine Expressions
A forced smile is painfully obvious. It never quite reaches the eyes and often looks more like you’re grimacing. To get a truly professional shot, you need to capture an authentic expression. If you’re taking your own photo, this means you need to be your own hype-person.
Don't just think "smile." That's a recipe for a cheesy grin. Instead, think about a real emotion or a specific memory. Remember a hilarious moment with a friend, that feeling after a big professional win, or something you're genuinely looking forward to. This technique, known as emotional recall, triggers a real smile that lights up your entire face, especially your eyes.
If you’re going for a more serious, thoughtful expression, try the "squinch." It’s a term coined by photographer Peter Hurley and involves slightly squinting with your lower eyelids, like you’re laser-focused on something. It’s a subtle move that adds an instant dose of confidence and intensity to your gaze.
Try this quick exercise:
- Close your eyes and take a deep breath. Let your facial muscles completely relax.
- Think of a genuinely happy memory that makes you light up.
- On the count of three, open your eyes and let that feeling show.
- Snap the photo in that exact moment.
This process helps you bypass that self-conscious pressure to "perform" for the camera. The result is an expression that feels real, because it is.
How should you edit and retouch your photos?

The shutter click isn't the finish line. It's really just the beginning of the final polish. This is where a good photo becomes a great one, but the goal is always to enhance, not to invent. Your headshot should look like you on your very best day, not like a stranger.
Post-production can feel like a huge hurdle, but a simple workflow makes a world of difference. We're going to focus on subtle, natural tweaks that improve your image while keeping it authentic. The last thing you want is that over-edited, plasticky look that just screams "amateur."
Building a Foundation with Global Adjustments
Before you even think about zooming in on tiny details, you have to get the basics right. I’m talking about "global adjustments"—the edits that affect the entire image and set the stage for everything that follows. I always tackle these first, because they solve about 80% of the issues in most photos right off the bat.
Great tools like Adobe Lightroom (its free mobile app is surprisingly powerful) are perfect for this. If you're looking for free alternatives, Snapseed is fantastic on mobile, and GIMP is a solid choice for desktop.
Here’s the simple workflow I always start with:
- Correct Exposure: Is the photo too bright or too dark? Nudge the exposure slider to find that natural sweet spot. A pro tip is to shoot just slightly underexposed to keep all the detail in the brightest parts of the image, then you can gently lift the exposure in your editor without losing anything.
- Adjust White Balance: This one is essential for getting skin tones right. If your skin looks a little too orange or has a blueish tint, your white balance is off. Play with the temperature and tint sliders until the whites in the image look genuinely white and your skin looks natural.
- Dial in Contrast: A little bit of contrast adds punch and makes your photo feel more three-dimensional. A slight boost can make the image pop, but be careful here. Too much contrast will crush the details in the shadows and highlights, giving everything a harsh, unnatural look.
Nailing these three things gives you a clean, balanced canvas to build on. It's the bedrock of a professional, polished photo that still looks like you.
The Art of Subtle and Natural Retouching
With that solid foundation in place, now you can move on to the small imperfections. The keyword, and I can't stress this enough, is subtle. We’re not airbrushing you into oblivion. We're just tidying up temporary distractions so the focus stays where it should be: on your confident expression.
Think of it like getting ready for a big meeting. You’d make sure there’s no spinach in your teeth or a stray hair on your blazer. Digital retouching is the exact same idea.
A few essential retouching tasks include:
- Removing Blemishes: Use a spot healing or clone tool to gently remove temporary things, like a pimple that popped up overnight or a few stray hairs. Permanent features like moles or scars? Leave them. They are part of you.
- Softening Skin Gently: Please, avoid the plastic, over-smoothed look at all costs. Instead of a blurry filter, use a tool that lets you selectively reduce skin texture just a tiny bit. Focus on areas with larger pores or minor wrinkles, but keep key features like your eyes, lips, and hair perfectly sharp.
- Whitening Teeth and Eyes: A little truly goes a long way here. Use a selective brush to gently reduce any yellowing in your teeth and brighten the whites of your eyes. It adds a subtle sparkle that makes you look healthy and vibrant.
Your goal is enhancement, not erasure. An effective retouch should be invisible. If someone can immediately tell the photo has been retouched, you’ve probably gone too far.
Cropping for Maximum Impact Across Platforms
The final piece of the puzzle is the crop. A photo that looks amazing as a wide LinkedIn banner might not work as a tiny, square Instagram profile picture. Cropping is how you optimize your photo's composition for every context.
Don't just stick your face in the center and call it a day. Think about the rule of thirds, a classic principle from the art world. Imagine a tic-tac-toe grid over your photo—placing your eyes along that top horizontal line almost always creates a more dynamic and engaging shot.
Here are a few platform-specific things to keep in mind:
| Platform | Common Aspect Ratio | Cropping Tip |
|---|---|---|
| LinkedIn Profile | 1:1 (Square) | Crop in tight on your head and shoulders. You want your face to fill most of the frame so it's instantly recognizable in that little circle. |
| Website Bio | 3:2 or 16:9 (Wide) | A wider crop that includes more of your torso or even a bit of the environment can add personality and context. |
| Instagram Post | 1:1 or 4:5 (Vertical) | The 4:5 vertical ratio is gold on Instagram—it takes up more screen real estate. Use that extra space to your advantage. |
By mastering these simple editing steps—from foundational corrections to subtle touch-ups and smart cropping—you take full control of your professional image. This is the final polish that ensures all your hard work results in a photo that represents you with confidence and class.
What if you need a professional headshot fast?
Let's be real: sometimes you need a killer headshot for a last-minute speaking gig or a surprise job opportunity, and there’s just no time to book a photographer. This is where technology steps in with a surprisingly solid solution, letting you skip the cameras, lights, and scheduling headaches entirely.
AI headshot generators have popped up as a seriously practical alternative for busy professionals. They're a modern, fast way to get polished images without the usual time and money, making them a seriously practical option when you need to look sharp, fast.
How Does This AI Magic Actually Work?
The whole process is refreshingly simple. You just need to find a handful of recent, casual photos of yourself. We're talking clear selfies, maybe some pictures friends took, all shot in decent light from a few different angles. Your smartphone is more than enough for this part.
Once you upload your pictures, the AI engine takes over. It studies your facial features from the photos you provided to build a detailed digital version of you. From there, it starts generating a whole gallery of brand-new, studio-quality headshots. It can place you in different professional settings, with different lighting, and even in different outfits. One minute you’re in a sharp business suit, the next you’re in a casual blazer against an outdoor backdrop—all spun from your original selfies.
Platforms like BetterPic have really dialed in this process, churning out hundreds of options in just a few hours. This lets you play around with different vibes and pick the photos that truly nail your personal brand, all without ever stepping in front of a lens.
When an AI Headshot Just Makes Sense
A traditional photoshoot is a fantastic, personalized experience, but there are definitely times when an AI generator is the smarter, more strategic move. Knowing when to go which route can save you a lot of stress.
You might want to lean on an AI tool when you're:
- Up Against a Crazy Deadline: Got a press release, conference bio, or a job application due tomorrow? AI is unbeatable for speed.
- Need a Ton of Different Looks: An AI generator can create hundreds of variations with different clothes and backgrounds. It’s perfect for A/B testing your look on LinkedIn, your personal website, or different social media profiles.
- Working with a Tight Budget: Let’s face it, professional photographers offer incredible value, but their services are an investment. AI gives you a cost-effective path to a polished, high-quality result.
- Not a Fan of Being on Camera: For a lot of people, posing for a camera is just plain awkward. An AI tool completely sidesteps that anxiety, letting you get a confident-looking shot without the stress of a live shoot.
An AI-generated headshot isn't here to replace photographers. It's about having a powerful, accessible option when time, budget, or logistics make a traditional shoot impossible. It’s a modern tool for a fast-moving world.
Weighing the Pros and Cons
Like any tool, AI headshot generators have their strengths and weaknesses. It's good to have a balanced view so you know what to expect. If you're curious about the nuts and bolts, you can get a closer look at the process of creating AI headshots and see how it all comes together.
The Big Wins:
- Speed: We’re talking hundreds of options in hours, not days or weeks.
- Cost-Effectiveness: It's a fraction of the cost of a standard professional photography session.
- Variety: Instantly get a massive library of styles, outfits, and backgrounds without ever changing your clothes or location.
Things to Keep in Mind:
- Less Direct Control: You can't ask the AI to tweak a pose or adjust your smile in real-time like you could with a photographer.
- Potential for Minor Flaws: The tech is incredible, but there's still a slim chance you'll spot minor artifacts or small inconsistencies in some of the images.
For any modern professional, these tools are an incredible shortcut to a sharp online presence. By understanding how they work and when they make the most sense, you can make sure your personal brand always looks its best—even when you’re in a rush.
Common questions about taking professional brand photos
Even with the best guide, a few specific questions always seem to come up. Here are some of the most common ones I hear, with quick, practical answers to get you over those last hurdles.
Can I Really Get a Professional Photo with Just My Phone?
You absolutely can. Modern smartphone cameras are ridiculously good, but the secret isn't in the hardware—it's all about your technique.
The key is to focus on the fundamentals we've covered. Find some beautiful natural light (facing a large window is a classic for a reason). Use your phone’s Portrait Mode to get that soft, blurred background that immediately makes an image feel more professional. And please, please stabilize your phone on a small tripod. It’s the only way to guarantee a tack-sharp shot every time.
What's the Best Color to Wear for a Headshot?
When in doubt, go with solid, muted colors. Think navy blue, deep gray, maroon, or a rich forest green. These shades are universally flattering and keep the focus where it belongs: on your face. They project confidence without being loud.
As a general rule, steer clear of busy patterns, big logos, or any color that's too close to your skin tone—that’s a quick way to look washed out. Honestly, the best color is one that makes you feel great and fits the vibe of your personal brand.
The single biggest mistake in DIY headshots? Bad lighting. Harsh overhead lights or direct midday sun will cast deep, unflattering shadows under your eyes and nose. It's the fastest way to look like an amateur.
The fix is surprisingly simple: find soft, diffused light. You can get it by standing indoors facing a large window, shooting outside on a slightly overcast day, or even just finding a spot in open shade.
How Often Should I Update My Professional Headshot?
A good rule of thumb is to refresh your professional photo every two to three years. You'll also want a new one anytime your appearance changes significantly—a new haircut, growing a beard, or getting glasses, for instance.
Your headshot needs to be a current, accurate reflection of who you are. This is all about building trust. When people meet you in person after seeing your photo online, you want them to recognize you instantly. It avoids that awkward moment of confusion and keeps things professional from the start.
Ready for studio-quality headshots without any of the hassle? BetterPic uses AI to generate over 200 professional, photorealistic options from just a handful of your casual photos—all in under an hour. Skip the setup and get a polished look instantly at BetterPic.
Sources & References
- LinkedIn Profile Photo Tips — LinkedIn
- How Your Profile Photo Impacts Your LinkedIn Presence — LinkedIn Official Blog
- AI Image Generation Market Report — Grand View Research
- How AI Is Changing Photography — Forbes
- Professional Headshot Photography Pricing — Thumbtack

Written by
Apoorv SharmaHead of Performance
Apoorv leads performance and growth at BetterPic with 9+ years of experience across SEO, SEM, and growth marketing. He oversees content strategy, data-driven marketing, and hands-on testing of AI headshot platforms. Previously held senior performance marketing roles across the US, Belgium, and India.
- Google Analytics & Google Ads certified
- HubSpot Inbound & Content Marketing certified
- 9+ years in SaaS growth and performance marketing
Related professional headshots for individuals resources
Keep exploring this topic with focused resources from the B2C journey.
Primary destination:BetterPic homepage
Frequently Asked Questions
Can I take a professional headshot with my phone?
- Yes. Modern smartphone cameras are very capable, but technique matters more than hardware. Use Portrait Mode for a blurred background, face a large window for natural light, and stabilize your phone on a small tripod to guarantee sharp results every time.
What is the best lighting for professional photos?
- Soft, diffused natural light is the best and cheapest option. Face a large window for even, flattering light. On sunny days, shoot in open shade. Overcast skies act as a giant diffuser. Avoid direct midday sun, which creates harsh shadows and squinting.
What color should I wear for a professional headshot?
- Solid, muted colors work best. Navy blue, deep gray, maroon, and forest green are universally flattering and keep the focus on your face. Avoid busy patterns, big logos, and colors too close to your skin tone, which can wash you out on camera.
How do you pose for a professional photo without looking stiff?
- Turn your body about 45 degrees away from the camera, then look back toward the lens. Shift your weight onto your back foot to relax your stance. For a real smile, think of a genuinely happy memory rather than trying to force an expression.
How often should I update my professional headshot?
- Refresh your professional photo every two to three years, or anytime your appearance changes significantly. Your headshot needs to be a current, accurate reflection of who you are so people recognize you instantly when meeting in person.
What camera settings should I use for professional headshots?
- Use Aperture Priority or Manual mode. Set aperture between f/1.8 and f/4 for a blurred background, keep ISO at 100 (up to 400 in low light), and maintain a shutter speed of at least 1/125th of a second. A 50mm or 85mm lens is ideal for portraits.
Save 87%on average on your professional photos.
Whenever, wherever you are.
Get studio-quality, 4K images in a variety of outfits & settings in less than an hour.
Get your headshots nowStart now