
How to Prepare for Professional Headshots and Make a Great Impression

This article is part of our Professional Headshots collection.
You're getting a professional headshot. Good. It's one of the smartest investments you can make in your career, but showing up and smiling isn't enough. Getting a photo that truly works for you starts way before you step in front of the camera.
First things first: what is this photo for? Is it for your LinkedIn profile? The company website? An upcoming speaker bio? Each use case calls for a different tone, background, and even expression. A little strategic thinking upfront turns a simple photo into a powerful career asset—one that communicates exactly what you want it to, whether that's competence, creativity, or trustworthiness.
Why Your Professional Headshot Matters More Than Ever
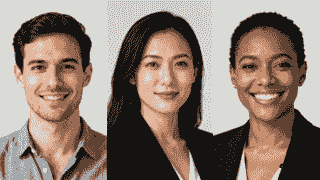
In a world where most of our interactions begin online, your headshot is your first handshake. It’s the silent introduction that happens long before you ever say a word, instantly shaping perceptions on platforms from LinkedIn to your company’s “About Us” page. In a fraction of a second, that single image tells a story about your personal brand, your professionalism, and how approachable you are.
This isn't just a hunch; the numbers back it up. The professional headshot photography market is on track to hit $1.5 billion in 2025, growing at an annual rate of about 7%. That boom is a direct reflection of just how critical personal branding has become for everyone, from corporate leaders to freelancers.
Defining Your Headshot's Purpose
Before you even think about what to wear, you need to nail down the primary goal for your new headshot. The context is everything.
A creative director’s portfolio, for instance, needs a photo that pops with personality and innovation. But a headshot for a financial advisor’s website must project stability and trust. Figure out your audience and your message first—that's the foundation for a truly effective photo.
A great headshot doesn't just show what you look like; it shows who you are in a professional context. It's a strategic tool designed to open doors and build connections.
Aligning Your Image with Your Brand
Your personal brand is that unique mix of your skills, experience, and personality. Your headshot should be a visual shortcut to all of that. To get it right, think about the specific attributes you want to communicate.
- Want to project authority and expertise? Go for a clean, professional background with strong, confident posing. A well-fitted blazer or classic, structured attire is a safe bet here.
- Need to showcase creativity and innovation? You can get more dynamic. Consider an environmental portrait (one taken in your workspace, for example) with a more relaxed expression. Your wardrobe can also be a bit more colorful or uniquely styled.
- Aiming for approachability and trust? A warm, genuine smile is non-negotiable. Softer lighting and a less formal (but still polished) outfit can create that welcoming vibe.
This alignment is absolutely critical for your online presence. It's worth taking a look at some specific tips for selecting the ideal LinkedIn headshots to make sure your photo hits the mark and grabs the right kind of attention.
Ultimately, your headshot is an investment in how the professional world sees you. A little thoughtful preparation makes all the difference.
How to Find and Collaborate With the Right Photographer
Think of your headshot photographer as less of a vendor and more of a strategic partner. Anyone can snap a picture, but the right photographer helps build your visual brand. Honestly, this collaboration is the single most important decision you'll make in the entire process.
Your search should start with a deep-dive into portfolios. Don't just get wowed by the one amazing shot on their homepage. Look through their entire gallery. Is the quality consistent? Do you see the same professional lighting, focus, and editing across all their work? Consistency is the hallmark of a true pro, not just a few lucky shots.
More importantly, does their style actually match the brand you want to project? If you're a senior partner at a law firm, a photographer who primarily shoots bright, airy portraits for artists probably isn't the right fit. You're looking for someone whose work feels like a natural extension of your industry and personal brand.
Vetting Your Potential Photographer
Once you've got a shortlist of a few photographers whose work you like, it's time to connect. A quick consultation call—phone or video—is non-negotiable. This is your chance to see if you actually click with them and to get a feel for their expertise. You’re going to be spending a decent amount of time with this person, so feeling comfortable is a big deal.
When you chat, move beyond the price tag. Your goal is to understand their process and experience.
- "Can you walk me through how you help clients relax and look natural?" A seasoned headshot photographer won't stumble on this. They'll have a clear strategy, from giving specific direction to using conversation to get genuine expressions.
- "What’s your approach to retouching?" The goal is natural, professional retouching that makes you look like you on your best day. You want to avoid the "airbrushed mannequin" look at all costs.
- "What's the typical turnaround time for the final images?" This is a simple but crucial question for managing your own expectations and timeline.
A photographer's job is 50% technical skill and 50% people skills. They have to create an environment where you feel comfortable enough to be yourself. The best camera in the world can't fix a tense, awkward expression.
Finding a great local pro is the first hurdle. To make it easier, you can check out our guide for finding headshot photographers near you, which breaks down what to look for in your specific area.
Creating a Clear Creative Brief
To make sure you and your photographer are on the same page, you need to give them a simple creative brief. This isn't some formal, multi-page document. A clear, concise email is all it takes to eliminate guesswork and set the shoot up for success.
Start by defining the "why" behind the headshot. What's its purpose? Then, list a few keywords that describe your professional brand. Think words like "authoritative," "approachable," "innovative," or "trustworthy." These act as a compass for the photographer when they're directing you.
Next, give them some visual inspiration. Pull together 3-5 headshots you admire, whether from their portfolio or elsewhere. For each one, add a quick note about what you like—maybe it's the specific lighting, the expression, the background, or just the overall mood.
Finally, cover the logistics. Will you be in a studio with a simple backdrop or on-location at your office? Discussing these details ensures every element of the photo is intentional. A solid brief empowers your photographer to nail the shot you need.
Keep in mind that session pricing varies a lot. Our 2025 research shows costs can run from $50 to over $1,200. A typical starting package lands around $283 and usually gets you one to three fully edited images. You can get a much more detailed breakdown of what to expect by exploring the full analysis of headshot costs in 2025.
Choosing Your Wardrobe and Grooming for the Camera
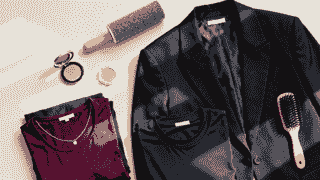
What you wear in your headshot is doing more than just covering your shoulders; it’s a strategic choice. The right outfit reinforces your brand and communicates confidence, while the wrong one can be a major distraction or send a confusing message. Your goal is simple: choose clothes that make you look polished and authentic without stealing focus from your face.
This is not the time to chase fleeting fashion trends. Timeless, classic pieces always win because they give your headshot a much longer shelf life. Think solid colors, classic silhouettes, and quality fabrics that drape well instead of bunching or wrinkling. Your wardrobe is there to support the story you're telling, not to be the main character.
Aligning Your Outfit with Your Industry
Before you pull anything out of your closet, think about your professional world. Your clothing needs to feel authentic to your field and the role you hold. A software engineer at a startup is going to project a different image than a C-suite executive at a global bank, and their wardrobes should reflect that.
What impression are you trying to make? Authoritative and trustworthy? Creative and approachable?
- Corporate & Finance (Law, Banking, Executive Leadership): Stick with the classics. A well-tailored dark blazer, a crisp button-down shirt, or a sheath dress in a solid neutral like navy, charcoal, or black is perfect. These pieces convey seriousness and authority.
- Tech & Startups (Developers, Marketers, Founders): The vibe here is usually more relaxed, but that doesn't mean sloppy. Think elevated casual—a quality crewneck sweater over a collared shirt, a smart polo, or even a simple, well-fitting dark t-shirt under a casual blazer.
- Creative Fields (Design, Arts, Media): This is where you can inject a bit more personality. Rich jewel tones like emerald, sapphire, or deep red look fantastic on camera and hint at creativity. You might also play with subtle textures or unique necklines, just as long as they don’t overpower the shot.
A good rule of thumb is to dress one level up from your typical daily work attire. It shows you respect your professional image and came prepared.
Mastering the Details of Your Clothing
Once you’ve picked a few potential outfits, the real work begins. The camera is incredibly unforgiving—it will highlight every single detail you might miss in person. Fit is absolutely non-negotiable. Clothing that’s too tight will pull and bunch in awkward ways, while anything too big will just look sloppy.
Get every piece ready before you walk into the studio.
- Freshly Pressed: All clothing must be steamed or ironed. Wrinkles are the #1 amateur mistake, and they are surprisingly difficult and expensive to fix in post-production.
- Lint-Free: Run a lint roller over every garment right before you put it on, especially if it's a dark color. Studio lights will pick up every last piece of dust, hair, and lint.
- Bring Options: Never, ever show up with just one shirt. Bring at least 2-3 different tops and maybe an extra blazer or sweater. This gives you and the photographer the flexibility to see what truly works best with the lighting and background.
Your clothing should complement you, not compete with you. The best choices are often the simplest ones. Avoid busy patterns, large logos, and overly bright or distracting colors that pull focus away from your face.
To make it even simpler, here's a quick guide to help you choose the right pieces.
Headshot Wardrobe Do's and Don'ts
| Do | Don't |
|---|---|
| Choose solid colors. Navy, grey, black, and jewel tones are flattering on almost everyone. | Wear busy patterns. Small checks, herringbone, or complex prints can create a distracting moiré effect on camera. |
| Opt for classic necklines. Crewnecks, v-necks, and collared shirts frame the face well. | Pick trendy or loud styles. Avoid off-the-shoulder tops, loud logos, or anything that will quickly date your photo. |
| Ensure a perfect fit. Tailoring is your best friend. Your clothes should skim your body, not cling or hang off you. | Forget about wrinkles. Assume every wrinkle will show. Iron or steam everything beforehand. |
| Bring multiple options. Having choices gives you and the photographer flexibility to find the perfect look. | Wear distracting jewelry. Large, shiny necklaces or dangling earrings can pull attention away from your eyes. |
| Consider fabric texture. Subtle textures can add depth, but avoid anything too shiny or bulky. | Choose flesh-toned colors. Beige, tan, or light pastels can sometimes wash out your skin tone under studio lights. |
This table is your cheat sheet. When in doubt, lean toward simplicity and a classic fit.
Grooming for a Polished and Natural Look
Grooming is just as crucial as your wardrobe. The goal isn't to look like a different person, but rather the best possible version of yourself: healthy, rested, and ready for business. A little prep in the days leading up to your session goes a long way.
Try to get plenty of sleep and stay hydrated the week of your shoot. It makes a surprising difference in your skin's appearance, reducing puffiness and giving you a natural glow.
Skincare and Makeup Arrive with clean, well-moisturized skin. If you wear makeup, the goal is a natural, enhanced look, not a dramatic evening face. Heavy foundation can look cakey under professional lights, so stick to a matte finish to minimize shine. A bit of concealer where needed, a touch of blush, and defined eyebrows can make a huge impact.
Hair and Facial Hair If you're getting a haircut, schedule it for about a week before your session. This gives it time to settle in and look natural. On the day of the shoot, style your hair the way you would for an important meeting. Don't experiment with a brand-new style you're not comfortable with. For those with facial hair, make sure it’s neatly trimmed and groomed. If you prefer a clean shave, do it carefully to avoid razor burn.
Posing and Expressions That Look Natural and Confident
Let's be honest: almost no one feels comfortable in front of a camera. That slightly awkward, stiff feeling is the default for most people. The secret isn't to just "act natural"—that's impossible advice. The real key is having a plan for your body and expression so you can project confidence on cue.
A great photographer will be your guide, of course. But walking into the studio already knowing these techniques will give you a massive sense of control and lead to far better results. This is about more than just picking an outfit; it’s about practicing how you'll physically show up.
Mastering Your Posture and Body Language
Your posture is the entire foundation of a powerful headshot. Standing square to the camera is a common mistake that can look confrontational or robotic. The first, easiest fix? Angle your body slightly—about 45 degrees away from the lens—and then turn your head back to face the camera.
This one simple move instantly creates a more dynamic and flattering line. It’s a classic for a reason: it slims your profile and makes you look far more engaged.
Beyond that initial angle, a few small tweaks can make a world of difference. The goal is to look composed, not frozen.
Here are a few actionable tips to try in the mirror:
- Create a Slight Bend: Stiff, straight lines are the enemy. Whether you're standing or sitting, a subtle bend in your elbow or knee immediately breaks up that rigidity. If you put your hands in your pockets, hook your thumbs out. It keeps the pose looking relaxed, not forced.
- Lean In (Just a Bit): This is a pro tip. A very slight lean toward the camera from your waist makes you look instantly more connected and engaged with the viewer. It's a tiny move that signals confidence and approachability.
- Watch Your Shoulders: When we get nervous, our shoulders have a tendency to creep up toward our ears. Before the photographer starts shooting, take a deep breath and consciously roll your shoulders back and down. You’ll immediately look and feel more authoritative.
Think of every pose as intentional, but never forced. Having these moves in your back pocket gives you a huge head start.
Your hands are often the biggest giveaway of nervousness. Don't just let them hang. Give them a job. Lightly rest one on your hip, cross your arms confidently, or gently hold the lapel of your jacket.
Achieving a Genuine and Confident Expression
Your expression is the emotional core of your photo. A forced smile or a deer-in-the-headlights stare can ruin all the work you put into your wardrobe and posing. The secret to a genuine expression is to connect it to a real thought or feeling.
Telling someone to "smile" on command almost always leads to a tense, unnatural look. A much better approach is to think of something specific that brings on a genuine feeling of happiness—a recent win at work, a funny memory, or an upcoming vacation you're excited about. Let that feeling show on your face. A real smile always reaches the eyes.
Here's another powerful technique: the subtle squint. A wide-eyed stare can read as nervous or surprised. By narrowing your eyes just slightly, as if you're focusing on something interesting in the distance, you instantly project confidence and intelligence. It’s a trick used by CEOs and public figures for a reason. Practice it in the mirror—the difference is striking.
Finally, don't forget about your jaw. A lot of people hold tension there without even realizing it, which can make you look stressed in photos. To relax it, gently press your tongue to the roof of your mouth, just behind your front teeth. This simple action not only releases jaw tension but can also help subtly define your jawline.
Your Game Plan for a Stress-Free Photoshoot Day
The day of the shoot is where all your planning pays off. While a great photographer will absolutely guide you, walking in calm, confident, and organized makes a world of difference in the final images. The whole point is to squash any last-minute stress so you can just be present and engaged during the session.
Think of it as starting the night before. Prioritize getting a full night of solid sleep—at least 7-8 hours is the goal. Good rest really does minimize under-eye circles and helps you feel more alert and relaxed on camera. And don't forget to hydrate. Drink plenty of water and maybe skip that extra salty meal or glass of wine, which can cause puffiness.
The Morning of Your Shoot
On the morning of, start with a light, healthy breakfast. You want to feel energized, not sluggish from something heavy or greasy. Most importantly, give yourself plenty of time to get ready without rushing. Rushing is a surefire way to crank up your stress levels.
Stick to the grooming plan you already figured out. If you're shaving, be careful to avoid irritation. If you're doing your own makeup, find a spot with good natural light. Before you walk out the door, do a final check of your bag. A simple checklist can be a lifesaver here:
- Your Outfits: Neatly folded or, even better, on hangers. Make sure they're completely wrinkle-free.
- Touch-Up Kit: Think powder for shine, lipstick or lip balm, and a comb or brush for quick fixes.
- Grooming Essentials: A lint roller and some oil-blotting sheets are non-negotiable. Seriously, bring them.
- A Healthy Snack: Something simple like a protein bar or a handful of almonds can be a game-changer if your energy starts to dip.
- Water Bottle: Staying hydrated is key, even during the shoot itself.
If you happen to be the one coordinating this for a whole team, getting the logistics right is crucial. You can find some great, detailed guidance on arranging professional headshots for teams to make sure everyone shows up just as prepared as you are.
Mental Rehearsal and Arrival
Right before you leave, take five minutes in front of a mirror. This isn't about vanity; it's a practical mental run-through. Practice the expressions you and your photographer talked about—that confident, focused look, and your warm, approachable smile. Connecting with them beforehand makes it so much easier to bring them out naturally when the camera is on.
Plan to get to the studio about 10-15 minutes early. That little buffer saves you from the anxiety of running late and gives you a moment to settle in, find the restroom, and do any final touch-ups without feeling frantic. Use this time to get comfortable with the space and say a proper hello to your photographer.
Don’t just show up; arrive ready to collaborate. Your mental state is just as important as your wardrobe. Walk in feeling prepared, and you'll project the confidence you want your headshot to capture.
This really boils down to the core elements of a great shot: getting your posture right, finding a genuine expression, and feeling relaxed.

The flow is simple: a strong physical foundation (your posture) makes it possible to deliver a genuine expression, which only really happens when you feel truly relaxed and comfortable.
What Our Data Shows About Preparation and Results
Based on feedback from thousands of BetterPic users, preparation directly correlates with satisfaction:
- Users who read our upload guidelines before submitting photos are 2.1x more likely to rate their results as excellent compared to those who skip the guidelines.
- The most common reason for re-generation requests is clothing choice. 28% of users who request a redo cite outfit dissatisfaction, reinforcing the importance of selecting attire before taking source photos.
- Grooming matters for AI too. Our quality scoring system detects and penalizes flyaway hair, smudged glasses, and uneven collars. Users who prepare as they would for a studio session get measurably better AI results.
- Users who upload photos taken on the same day get more consistent results than those mixing photos from different days with different lighting conditions, clothing, and grooming.
Your Headshot Questions, Answered
Even after you've done all the prep work, it's natural to have a few questions floating around. Getting a professional headshot is a real investment in your personal brand, and you want to get it right. Let’s tackle some of the most common questions we hear from professionals.
How Long Does a Typical Headshot Session Take?
This isn't a five-minute, say-cheese-and-you're-done kind of thing. For a standard individual session, you should block out about 60 to 90 minutes. That’s the sweet spot for getting settled, trying a couple of different outfits, and letting the photographer work their magic without anyone feeling rushed.
If your package includes multiple "looks"—say, a formal blazer shot and then a more relaxed sweater version—or if you're shooting in more than one spot, it could easily stretch to two hours. The whole point is to give you time to get comfortable. The best, most natural shots happen when you're not watching the clock.
Do I Really Need a Professional Makeup Artist?
For almost everyone, the answer is a resounding yes. You might be a wizard with your own makeup, but what a professional makeup artist (MUA) does for photography is a completely different ballgame. They know precisely how to work with harsh studio lighting.
Here's why it's one of the smartest line items in your budget:
- Shine is the enemy. Pro-grade matte products are built to kill the glare from studio lights in a way that your everyday foundation just can't.
- They define your best features. A great MUA can subtly contour your face and make your eyes pop on camera, all while looking completely natural.
- It cuts down on retouching. When your makeup is flawless from the start, there are fewer blemishes and uneven spots to fix later. That can save time and sometimes even money in post-production.
If hiring an MUA just isn't in the cards, go for a clean, matte look. But honestly, if you can swing it, a pro MUA is one of the single best ways to elevate your final photos from good to incredible.
How Many Outfits Should I Bring?
Always, always bring more options than you think you need. The magic number is somewhere between three to five different tops. You won't wear them all, but having choices on hand is non-negotiable.
Your photographer is your best consultant here. They can look at your options and tell you which colors and necklines will pop against the background and lighting they've set up. That shirt you absolutely love in the mirror might look flat or create a weird color cast on camera. Backups are your safety net. Try to bring a mix of colors, necklines, and levels of formality—like a sharp blazer, a classic sweater, and a crisp button-down.
The biggest mistake you can make is showing up with only one option. A tiny, unnoticed stain, a stubborn wrinkle, or a color that just doesn't vibe with the lighting can completely derail a shoot if you have nothing else to change into.
How Do We Pick the Final Photos and How Do I Get Them?
The selection process is a team effort. Once the camera is down, most photographers follow one of two paths.
- The On-the-Spot Review: Right after the session wraps, you'll huddle up with the photographer to go through the shots together. They'll guide you, pointing out the strongest images based on expression, posture, and all the little technical details.
- The Online Proofing Gallery: More commonly, you'll get an email a day or two later with a link to a private online gallery. This will have all the best unedited shots (the "proofs"). You can then take your time to click through and pick your favorites for the final retouching.
After you've made your picks, the photographer gets to work on the polish. This isn't about changing how you look; it's about making you look like you on your absolute best day. Think color correction, fixing stray hairs, and removing any minor blemishes. The goal is polished and authentic, not plastic.
Finally, your finished images are almost always delivered as a digital download. You'll get high-resolution files ready for anything—from your LinkedIn profile to a feature in a print magazine.
Ready to skip the stress of a traditional photoshoot and get studio-quality images from the comfort of your home? BetterPic uses advanced AI to create photorealistic and fully customizable professional headshots in under an hour. Choose from over 150 styles and get the perfect look that represents your brand.
Sources & References
- LinkedIn Profile Photo Tips — LinkedIn
- How Your Profile Photo Impacts Your LinkedIn Presence — LinkedIn Official Blog
- AI Image Generation Market Report — Grand View Research
- How AI Is Changing Photography — Forbes
- Professional Headshot Photography Pricing — Thumbtack

Written by
Apoorv SharmaHead of Performance
Apoorv leads performance and growth at BetterPic with 9+ years of experience across SEO, SEM, and growth marketing. He oversees content strategy, data-driven marketing, and hands-on testing of AI headshot platforms. Previously held senior performance marketing roles across the US, Belgium, and India.
- Google Analytics & Google Ads certified
- HubSpot Inbound & Content Marketing certified
- 9+ years in SaaS growth and performance marketing
Related professional headshots for individuals resources
Keep exploring this topic with focused resources from the B2C journey.
Primary destination:BetterPic homepage
Frequently Asked Questions
What should I wear for a professional headshot?
- Wear solid colors like navy, charcoal, or jewel tones in classic, well-fitted pieces. Avoid busy patterns, large logos, and trendy items that will date quickly. Dress one level up from your typical daily work attire, and bring 2-3 backup tops for flexibility.
How long does a professional headshot session take?
- A standard individual session takes about 60 to 90 minutes. If your package includes multiple outfits or shooting locations, it could stretch to two hours. The goal is to give you enough time to get comfortable so the most natural shots emerge.
Do I need a professional makeup artist for my headshot?
- For most people, yes. A professional makeup artist knows how to work with studio lighting, using pro-grade matte products that eliminate glare. They define your features on camera while keeping the look natural, and their work also reduces post-production retouching needs.
How do I look natural and not stiff in headshot photos?
- Angle your body about 45 degrees from the camera, then turn your head back toward the lens. Think of something genuinely happy for a real smile. Practice the 'squinch' (slightly tightening lower eyelids) to project confidence instead of a deer-in-the-headlights look.
How much do professional headshots cost in 2025?
- Costs range from $50 to over $1,200. A typical starting package is around $283 and usually includes one to three fully edited images. The professional headshot photography market is on track to hit $1.5 billion in 2025, growing at about 7% annually.
Save 87%on average on your professional photos.
Whenever, wherever you are.
Get studio-quality, 4K images in a variety of outfits & settings in less than an hour.
Get your headshots nowStart now